Screen2ipcam · magicweb.win العربية Download

Running a VPN? Two minutes to fix it.

If a VPN client is running on the same PC, your recorder may suddenly stop finding the camera — even though nothing else changed. Nothing is broken. The program is simply announcing the wrong address. Here is why, the two ways to fix it, and how to turn the VPN into something useful: watching one branch from another.

No update needed Works today Any VPN client Branch to branch

What is actually happening

A VPN client adds a second network adapter to Windows, with its own address. Your PC now has at least two: the real one on your local network, and the VPN one.

Screen2ipcam publishes one address so that recorders know where to find the stream. It normally picks the adapter Windows considers primary — and many VPN clients deliberately make themselves primary the moment they connect. When that happens, the program announces the VPN address, and your NVR, sitting on the ordinary local network, has no route to it.
Your Windows PC 192.168.1.58 LAN adapter 10.8.0.4 right address VPN address Announced to your network one address only NVR / DVR on the LAN cannot reach 10.8.x
With a VPN client running, your PC has more than one address. Screen2ipcam announces a single one — and if Windows puts the VPN adapter first, that is the one your recorder (DVR/NVR) is told to use.
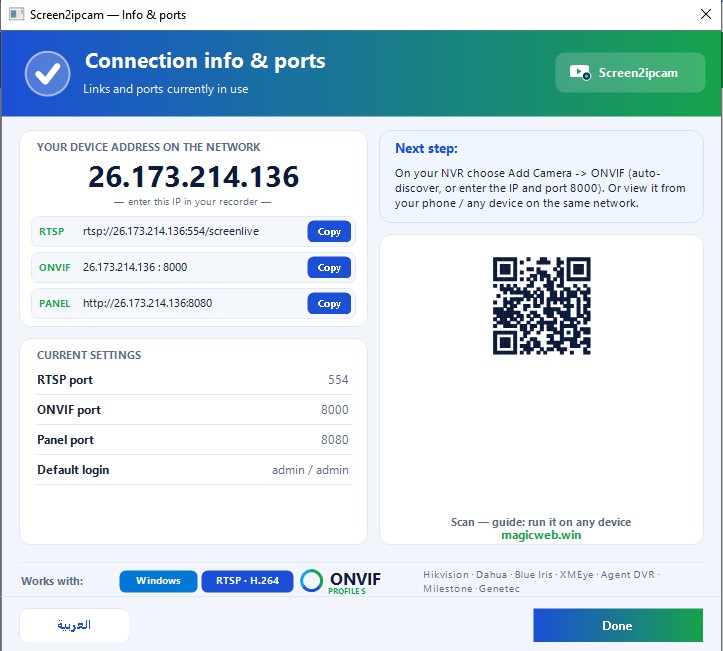
The Connection info and ports window showing the address the program is announcing, together with the RTSP, ONVIF and panel links and the ports in use.
This is how you check it in ten seconds. Open Connection info & ports in the program and read the address at the top. In this example it is a VPN address, not one from the local network — which is exactly why the recorder (DVR/NVR) could not reach it. If the address there is not on the same range as your recorder (DVR/NVR), you have found the problem.
The stream itself is fine. Video, audio and recording all still work. The only thing that went wrong is which address was handed to your recorder.
Fix it — pick one

Two ways. The first is the one we recommend, because the VPN client cannot undo it.

Recommended

Make your LAN adapter win

  1. Press Windows + R, type ncpa.cpl and press Enter.
  2. Right-click your normal adapter (Ethernet or Wi-Fi) → Properties.
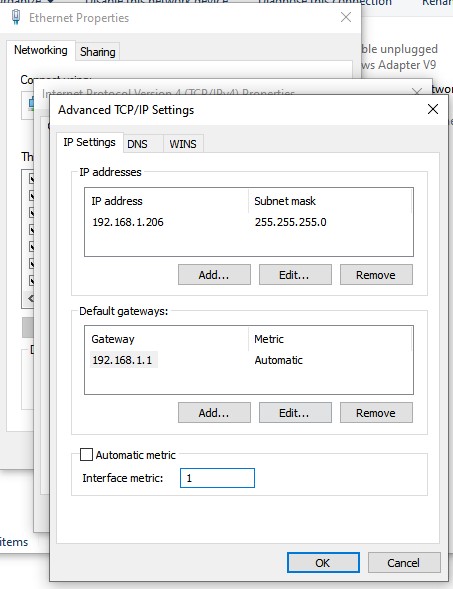
  3. Select Internet Protocol Version 4 (TCP/IPv4)PropertiesAdvanced.
  4. Untick Automatic metric and type 1 in Interface metric.
  5. Click OK on every window, then restart the PC.
Advanced TCP/IP Settings with Automatic metric unticked and Interface metric set to 1.
Automatic metric unticked, Interface metric set to 1. That is the whole change.
Why this one is better: a VPN client rewrites its own adapter settings every single time it starts, so anything you change there is undone tomorrow. It does not touch your LAN adapter. Give that adapter the lowest metric and it stays primary through restarts, reconnections and VPN updates.
Alternative

Add it to the recorder (DVR/NVR) as a direct RTSP address

  1. Open a Command Prompt, run ipconfig, and note the IPv4 Address of your normal adapter — the one on the same range as your recorder, for example 192.168.1.58.
  2. In your recorder, add the channel using RTSP — often called manual, custom or general protocol — instead of the ONVIF search.
  3. Type the address yourself: rtsp://192.168.1.58:554/screenlive (or /screensub for the lighter stream).
Why this works even with the VPN connected: the stream is served on every network the PC is attached to, not only on the one that was announced. So your local address answers normally, whatever address the program advertised.

Use this when you are not allowed to change adapter settings, for example on a company-managed PC. Give that PC a static or reserved address so the link keeps working.

Now the useful part: watch one branch from another

Once the local side behaves, that VPN becomes a feature rather than a nuisance. A recorder (DVR/NVR) or a PC at your second branch can pull the stream across the VPN and record it there, with no port forwarding and nothing exposed to the internet.

Add the camera manually at the far end, using the VPN address of the PC that is running Screen2ipcam:

What you needAddress to use
Main stream, full qualityrtsp://VPN-IP:554/screenlive
Sub stream, light on bandwidthrtsp://VPN-IP:8554/screensub
ONVIF, to add it as a cameraVPN-IP on port 8000
Web panelhttp://VPN-IP:8080
Automatic search will not find it across a VPN. Cameras announce themselves with a message that is only delivered inside one local network, and VPNs do not carry that kind of traffic. This is normal for every IP camera, not something specific to Screen2ipcam. Add the camera by typing its address instead of using the search button and it connects straight away.
On a slow or shared link, use the sub stream. The main stream is full screen resolution; the sub stream is much lighter and is designed for exactly this. Most recorders let you choose which stream a channel uses.

A real example

A pharmacy group runs two branches joined by a VPN. In the first branch, the till PC runs Screen2ipcam so the cashier screen is recorded alongside the shop cameras. In the second branch, the manager wanted to see that same screen live.

The first attempt failed for exactly the reason above: the VPN client kept making itself the primary adapter, so the local recorder (DVR/NVR) lost the camera every time the VPN reconnected. Setting the LAN adapter metric to 1 fixed it permanently — the local recorder was happy again, and the second branch added the same camera manually over the VPN and recorded it there too.

One PC screen, recorded in two places at once, over a link that was already there. No extra hardware and nothing published to the internet.

What changes things, and what does not

Two questions come up constantly once a system is running, so here are the honest answers.

Changing hardware or reinstalling Windows

What you doYour licenceYour recorder (DVR/NVR) channel
Swap the network card, the drive, the board or the processor Keeps workingKeeps working
Reinstall Windows on the same PC Keeps workingMay need attention — see below
Move to a completely new PC Ask us for a transferRe-check the channel

After reinstalling Windows

A fresh install starts from defaults, so three things reset: the panel password goes back to the default, the address may be handed out differently, and any port you customised returns to its standard value.

Make the new install look like the old one and your recorder will not notice anything. Give the PC the same address, set the same panel password, keep the same ports — then leave the recorder alone. If you do need to touch it, edit the existing channel rather than deleting it, so older footage stays attached to the same channel.

Installing on many PCs from one Windows image

If your IT team clones a single Windows image onto several tills, run the standard Windows preparation step (sysprep) before cloning, as you would for any software. That gives every PC its own identity, and each one then appears as its own camera. Adding each PC by typing its address also avoids any confusion.

Quick reference

WhatDefaultIf that port is busy
RTSP video5548554
ONVIF discovery and control800018000
Web panel808018080

The panel shows the addresses your PC is actually using, so when in doubt, read them there rather than guessing.

Try it on your own network

The trial is the complete program for 14 days. Install it on the PC you care about, open the stream from another machine, and see for yourself how it behaves with your VPN running.

Download the free trial
← Back to Screen2ipcam — magicweb.win  ·  No NVR? No problem  ·  Setup guide  ·  النسخة العربية  ·  support@magicweb.win

Windows is a trademark of Microsoft Corporation. VPN product names belong to their respective owners and are mentioned for compatibility information only; no affiliation or endorsement is implied.